

A concrete dome home is much more durable than any other conventionally-built home. The unique construction of a dome home allows it to withstand natural disasters and extreme weather conditions.
Along with its incredible strength, a dome home is also energy-efficient and saves both the environment and your wallet over time. Concrete domes are known for their ease of climate control thanks to the polyurethane foam applied to their interior.
Polyurethane foam creates an unbroken barrier between internal and external climates. This is different from conventional homes, where there can be breaks in insulation along every exterior wall stud and ceiling joist, allowing penetration of outside air into the house. As a result, HVAC systems have to work harder and drive up energy bills.
In previous articles, we described the first step of creating a dome home: laying the foundation, and the second step: airform inflation.
This article describes the third step of the dome building process: applying the polyurethane foam.
Read our complete 5-part series here:
Part 1: The Foundation
Part 2: The Airform
Part 3: Polyurethane Foam (you’re here!)
Part 4: Steel-Reinforcing Rebar
Part 5: Shotcrete
Preparing for the Polyurethane Foam
Polyurethane foam is a spray foam insulation made of polymers. When applied, it expands and fills all cracks, neutralizing air leaks. This foam application, along with other properties of a concrete dome, contributes to its incredible energy efficiency.
To prepare for the foam installation, we first cover all existing equipment and flooring to avoid damage due to foam overspray. This plastic covering also minimizes the amount of moisture from the ground making it easier to apply the foam.
Second, we make sure that the inside of the airform is completely dry. Any moisture on the airform may cause the foam to blister. If there is moisture on the airform, the area can be heated to prepare the surface for foam application.
Priming The Surface & Selecting A Foam
In order for the polyurethane foam to stick to the airform, an adhesive must first be applied. This adhesive, known as a primer, can be sprayed or rolled onto the interior surface of the airform.
Once we’ve applied a thin layer of the primer, and the surface has completely dried, the foam installation can begin. But first, we need to know what kind of foam is required.
Polyurethane foam comes in various set times engineered for cold or warm weather. We always use the fastest-setting foam available for the season and climate we find ourselves working to avoid undesirable foam application results.
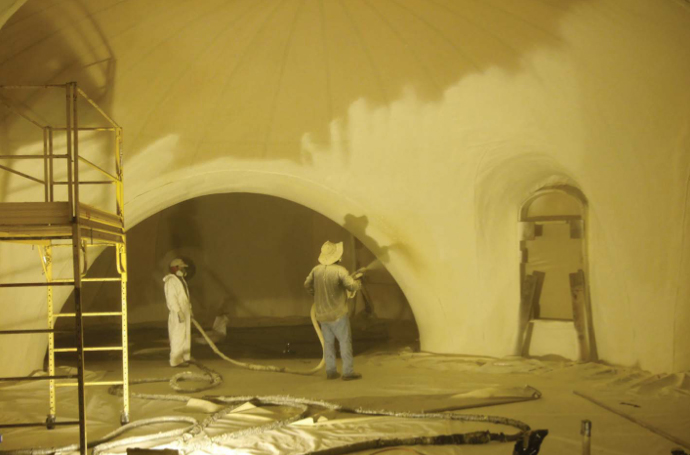
Applying The Foam
For best results, we apply foam slowly, spraying it from the bottom of the dome and moving towards the top. It should be applied about ½ inch thick across the entire airform. The foam takes just minutes to dry to the touch, but this can vary in extreme hot or cold temperatures. This application process is repeated throughout the dome until the foam is 3 inches thick across the entire internal surface of the airform.
Polyurethane foam insulation is a vital component in our dome construction process. As you’ll see in our upcoming article, it serves as the base for steel rebar reinforcement before applying the final layer of shotcrete.
Tour Our Dome Home
If you’d like to learn more about concrete domes from the team that builds these amazing structures or schedule a tour of our demo dome in Sioux Falls, click here or call 605-368-5477 today!
